Dressing your newborn Clothes Suitable for stages: 0 - 3 Months, 3 - 6 Months
Dressing and undressing a newborn can be tricky business, mainly because, 1 - they have very little control over their bodies, and 2 - they can be most impatient with the whole process.
It will help you to understand a bit about how your baby can move and position their body, and also know what they can't do. Newborns have mostly primitive reflexive movements. Various stimuli trigger these reflexes, including when areas of the skin or body are touched, moved or in response to a loud noise. The reflexes have an important role in survival, and through activation, the reflexes slowly start to disappear or integrate and be replaced by purposeful movement. Your baby's postural strength develops through a top-down direction, starting with the head. Since your newborn is working on head and neck strength, they will be most stable and supported when lying down on their back. Dressing and undressing can also be an opportunity to position your baby in side-lying and tummy positions.
Take some time to observe your baby and their movements. See how their feet turn in, their knees flex, their hips flex, how they position their arms. This information helps you work with their natural movement patterns and preferences when dressing and undressing them. Dressing is an opportunity to bond with your baby, to touch them, to play with them. Sometimes your baby won't be in the mood. Other times will be golden opportunities.
When you are just starting out, dressing your baby can take (what seems like) forever. Tiny babies don't want you to be mucking around; they want to be dressed and back to being cuddled, carried, or fed. Newborns require multiple changes during the day due to spit-ups and nappy blowouts. You will go through a lot of laundry during this time. If it is in the warmer months, consider keeping clothing to a minimum and take opportunities to do skin to skin whenever you can. Some experienced mothers swear that 'all you need is a boob and a blanket' to care for a baby. Sometimes simple and not over-complicating things when it comes to your baby is better.
With anything you do with your baby, it can be hugely beneficial for their language development to listen to you talk to them about what you are doing and what they are doing. This introduces them to the language of dressing and for understanding their body. All that talking is good for you too as it adds interest and a dimension of fun and creativity.
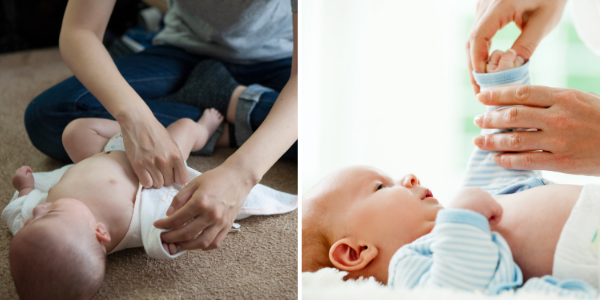
Going over the head
Tops, jumpers, and onesies with head holes rather than front-opening will need to be pulled over the head to don/doff. Look for clothes with larger head openings, shoulder flaps, or buttons on one shoulder. These will be the easiest to get on and off, and you can remove them by pulling it down over the body. This is useful if they are soiled, and you want to avoid pulling the clothes over the face.
Tips & tricks:
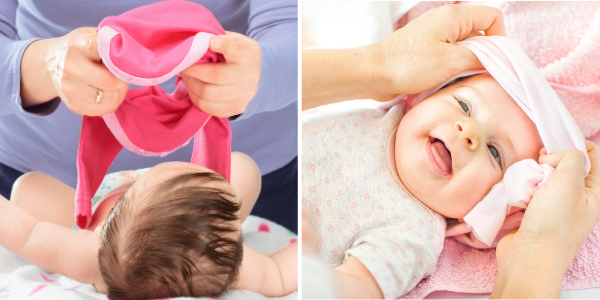
- Find the head hole and scrunch the cloth into a ring, holding it there with your fingers ready to stretch the hole over the head.
- Use your 4th and 5th fingers of both hands to gently lift their head from the back/crown while you use your remaining fingers to slide the head hole of the shirt/onesie or dress over their crown to the neck/shoulders.
- You can make faces and talk to your baby as you dress them and they might enjoy you saying "Pop!" or "Peek-a-boo" in a fun voice as their head comes through.
- For undressing, reverse this step when pulled up to the neck, bunch up the cloth with both hands, stretch the head hole using your fingers with enough space to quickly pull over the face. Lift the head with your 4th and 5th fingers to remove the ring or leave it there if you plan to pick your baby up next.
Front opening clothing

Many baby clothes are front opening with fasteners such as push studs, buttons or zippers. Onesies, jumpsuits, grow suits and some tops have front openings. The advantage is that you don't have to put anything over their head, and the fastener is along the front, which is accessible for you and comfortable for babies who lie on their backs to sleep.
Tips & tricks:
- Have the clothing already laid out flat on the changing surface before you put your baby down
- It will be easiest to set your baby down with their shoulders in line with the top edge of the onesie/top.
Arms through
To get the arms through an enclosed front piece of clothing, you want the fabric to have plenty of stretch. Second-hand clothing can be advantageous here as the material has relaxed a bit, giving it more stretch. Tiny babies like to hold their hands near their mouth with the arms close to their body or have the arm outstretched (such as with the fencing reflex pose). Their arm movements are quite jerky at first until they gain more control.
Tips & tricks:
- When the cloth is bunched up at the shoulders, use one hand to find the armhole then either hold the opening with your thumb and index finger (pincer grip) or if you have enough stretch, bunch up the sleeve over your thumb until your thumb is all the way through and close your index finger into a pincer grip.
- Use the other hand to gently grab the wrist and place your thumb at the base of the palm of their hand to trigger a fist/finger flexion.
- Guide the closed hand through the armhole using your other thumb as a guide
- For long sleeves, encourage your baby's arm to stretch/straighten to get most of the way through. Make sure the sleeve is free and not tangled.
- If the fist gets stuck, gently move the sleeve towards the shoulder, holding the arm with one hand, and using the other hand to find the fist and pull it through.
To get the arms through when the clothing is front opening, it can be much easier since you have better visibility and wider access.
Tips & tricks:
- Encourage them to form a fist by putting your thumb in the palm of their hand.
- There will be plenty of space to adjust the fabric over the hand/arm and either pull the fist through or ease the sleeve/cuff over the hand.
- When they are a little older, you can ask them to hold their fist closed and you guide their hand to the right spot where they can straighten their arm and move their own arm into the sleeve.
- It can be fun to say 'Pow!' in a funny voice when the hand comes through.
Over the torso, crotch (and legs if needed)
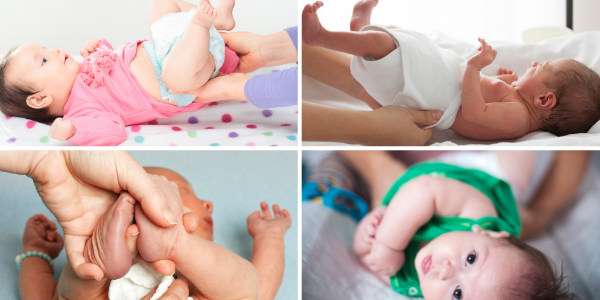
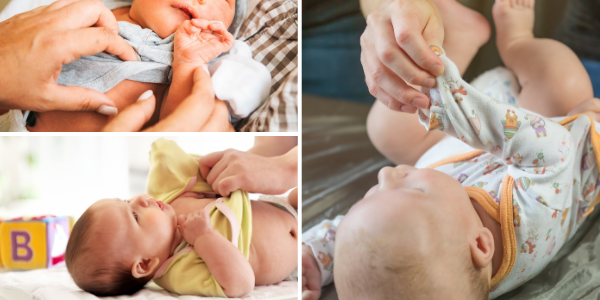
Pulling the clothes over the torso/middle is easy with front opening clothes, and somewhat harder with closed torso clothes. When dressing, this part comes after the arms are through and the clothing needs to be pulled over the back and the crotch/bottom.
- For tiny babies, their feet usually turn inward, and they are flexed at the knees. This makes it easy to hold their legs together at the ankles (seen in the above set of images in the below-left position). Then lift their bottom by lifting the ankles over their belly, tilting the pelvis off the changing surface, then use your other hand to pull down the top half of the clothing. If they are fussing and there seems too much pressure on their shoulders when their ankles are lifted, you can guide the legs to one side into side-lying to pull the clothing down one side and then guide the legs to the opposite side to pull down the remaining fabric. You can also provide some support around the shoulders when rocking them from side to side to help keep their spine straight.
- Another way is to support under their bottom with your open hand, then use your other hand to pull their clothing over their lower back and bottom.
- If the clothing has leg openings attached, make sure the clothing is pulled all the way down to give plenty of space to get the legs in.
- Put their foot through/or hold in position while you do up the fasteners.
- It's fun to say "pop" when you get the foot through.
Doing up the fasteners

If your baby is in a good mood, doing up, the fasteners can be a pleasant experience where you can make eye contact and fun 'popping' or 'zip' sounds. At other times, you want this part to be over pretty quickly.
- The push-stud fasteners are a popular option for baby clothes as they are fairly flat and won't rub on your baby's skin - the downside is that they take some time to get used to and can be fiddly/challenging for your fine motor skills.
- String fasteners are less common and not as comfortable for baby as there will be a knot against their skin and can come loose.
- A great and popular fastening option is the zip fastener. Zip suits are fast to do up and take off and can come with a double zip where you can undo from the bottom and just release the legs for nappy changes without undoing the whole suit. The downside is that zippers can be stiff in the clothing which can bulge if the clothing is too long, and they need to have a cover/flap at the neck to stop any potential rubbing due to the hard zip end.
- Fasteners can run down the middle at the front or cross over the front of the body and fasten at the front/side. The crossover option is suitable for tummy time as there are no lumps against the belly, and no pressure or rubbing over the umbilical stump while it heals initially.
- When the clothing is on, check that it is not too tight in any places, including the belly, shoulders, crotch and feet (especially for enclosed feet). If it is getting small, you are better to go up to the next size sooner rather than later.
- Have a system where too small clothes can be put in a storage box or bag as your baby grows out of them. Have the next size on hand for the day that your baby wakes up and has grown overnight right into the next size.
Leggings/bottoms
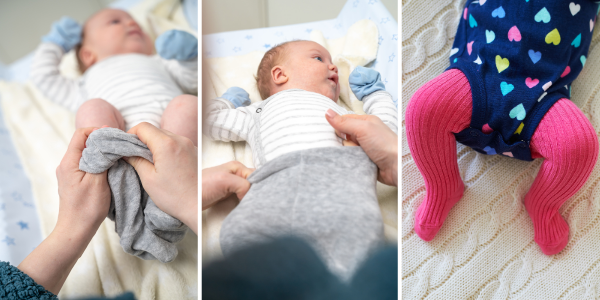
If your baby is wearing a top or short onesie, you might want to put leggings on over the top (or under the onesie crotch or dress). Leggings are usually very stretchy but tight around the legs. Other bottoms will usually be elastic waist and could be looser around the leg with a cuff or no cuff.
Tips & tricks
- It can be easier for cuffed pants or leggings to bunch up the cloth around your fingers and thumbs until you can hold the leg in a circle to put directly over the foot and position on the ankle. Pulling the rest of the cloth over the legs is then easy until you get to the crotch. Another way is to ease the cloth over the leg, pushing against the knee/thigh with your 4th and 5th fingers as you use your remaining fingers/thumb to hold and pull the cloth over the lower leg.
- Do the same for the other leg and then start pulling over the nappy. You can either support under the bottom with an open hand, using the other hand to pull up the waistband into place or hold the ankles together and over their belly, gently lift the bottom/pelvis using the weight of the legs, or rock from side to side while easing the pants up with the other hand. Another way is to hook the waistband under your thumbs then use your fingers to support under the bottom as you pull up using your thumbs.
- Adjust the waistband, so there are no creases and not too much pressure on the nappy in any spots. Make sure the waistband is not too tight as this can put pressure on their full milk tummy and on their healing umbilical stump (if very small).
- Later, they will develop the strength to lift their bottom by pushing through their feet while pulling their pants over their bottom.
- If this is the last step in dressing, say "All done!"
There you have it, some tips and tricks for dressing your newborn. If you are reading this before you have bought all the clothes, you will have a better idea of what clothes features to look for to make your job easier and increase your baby's comfort. For more on what clothes you can buy, check out our Baby Clothes Buying Guide.
Above all, have fun with your baby. The time you spend dressing or undressing them can be an opportunity to play and interact with your baby. They will love you for it!
Happy dress-up time!
Please note: Above all, any information on this website aims to provide general ideas for informational and educational purposes only. We encourage users to investigate several information sources, including, where necessary, independent individualised medical advice before making any decisions that could affect you or your child’s health or wellbeing.
BabyPeg participates in various affiliate programs and may earn a commission for referring our users through the links provided. This is at no additional cost to our users. We take great care in choosing products and services which align with the mission of promoting better health and wellness for our BabyPeg community. Where possible, products are tried and tested by us. To continue to provide BabyPeg as a free service and reach as many parents as possible, we appreciate your support in using the link provided to purchase if you decide the product is right for you.
Related Products

Aster & Oak Children's Clothing & Bedding

Gift Card Store Personalised & E-gift Cards
Emamaco Clothing Online Sales

Biome Eco Stores Online Sales
Bonds Bloody Comfy Undies

Biome Plastic Free Pegs
Smelly Bag Smelly Bag